The dip is perhaps one of the most underrated compound, bodyweight exercises. It’s a great addition to your strength training regime and here’s how you do it:
Grab two parallel bars, hoist yourself up, and then lower your entire body by bending your elbows.
That’s it, end of post.
But really, we know when you hear “compound exercise,” it’s referring to multi-joint movements that work several muscles or muscle groups at the same time.
The dip exercise trains:
– Chest
– Shoulders
– Triceps
– Back
– Abs
How to Do a Proper Dip Exercise
First of all, make sure you can do a dip.
Don’t hop up there and then lower yourself unless you’re fairly confident you can get through at least one. You don’t want to be tearing any muscles or falling.
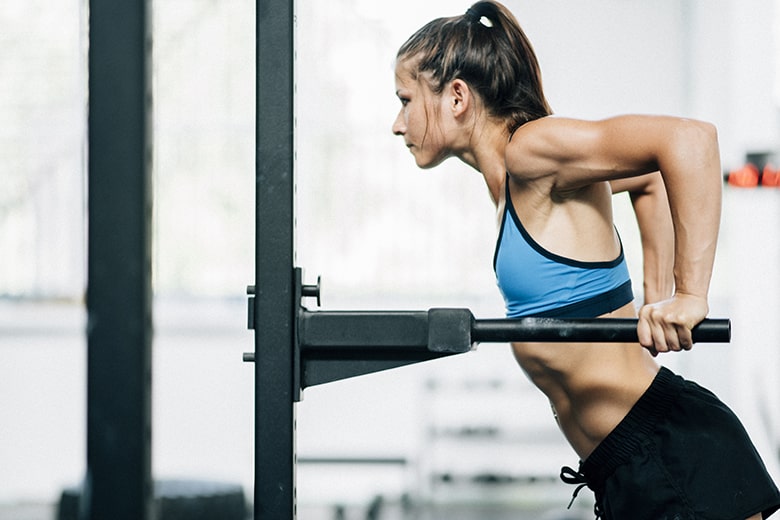
– First, grab the parallel bars (or rings), and hoist yourself up. At this point look straight ahead, and contract your stomach muscles (just like when you do squats and deadlifts). If you keep your abs tight for all of these exercises, you’ll never have to do a crunch again and you’ll still have washboard abs.
– Bend your knees if you like (so your feet are behind you) for stability purposes, but keep your head up and look straight ahead.
– Keeping your elbows at your side, lower yourself until your triceps are parallel to the floor. A lot of folks will recommend you go past parallel, but this puts too much strain on your shoulders at a weird angle and can cause injury/discomfort. I only go down to parallel and haven’t had any issues, so I’d recommend the same.
– Once you hit parallel, explode back up until JUST before you’re able to lock your elbows. By not locking your elbows, you keep the tension in your muscles and don’t jack up your joints. w00t.
– Now do another one. And then another!
Those are dips.
Keep your elbows as tight as possible, engage your abs, and hold your body in balance as you go up and down.
What If I Can’t Do a Dip? (Progression Plan)
Have no fear, we’ll have you doing dips in no; time. If you don’t quite have the strength to do a full bodyweight dip, follow our progression plan
LEVEL 1 DIP PROGRESSION: KNEE PUSH-UPS
Knee push-ups like this are a great way to progress to a regular push-up
If you’re just starting to develop your push muscles, our first stop will be knee push-ups.
LEVEL 2 DIP PROGRESSION: PUSH-UPS
Push-ups will help you develop chest muscles for doing proper dips. Only after you can do 20 proper push-ups should you consider trying to do a dip.
LEVEL 3 DIP PROGRESSION: ASSISTED DIPS
A resistance band is a great way to get started with this bodyweight exercise. Use a resistance band to help support your weight while you grow stronger. You can progress with weaker resistance bands until you feel comfortable trying a proper bodyweight dip.
Tips and tricks for perfecting your the dips
– Get your setup correct at the start. When people experience pain with their dips, it’s probably one of two things:
1. When your arms go too far back, they can close off the shoulder and start to cause pain.
2. If you allow your shoulders to round forward during the movement, it can again close off the area and create discomfort.
– Don’t swing – this goes for practically every exercise. If you start swinging your body as you go up and down, you take the emphasis off the muscles you’re actually trying to work.
– Don’t flare out your elbows if you can avoid it – the more “out” your elbows are, the more emphasis on your chest. Elbows tight = emphasis on shoulders and triceps.
– Don’t do half reps – again, this could be another universal rule. Challenge your muscles by bringing your triceps parallel to the ground, then make sure you extend arms to almost “elbows locked” at the top.
– Don’t go too fast—you want to be slow and in control during your dip. When you go too quickly, proper form is often sacrificed. Make sure you train safely by going slowly.
– Don’t settle for cheap substitutes – don’t use dip machines or other isolation triceps machines.
Variations on the Dip (Advanced Dip Moves)
Here are some advanced dip variations. Once you can do 3 sets of 15 dips no problem, you have a few options to ramp up the difficulty:
– Add weight to your bodyweight dips by:
– Picking up a dumbbell between your feet (challenging)
– Wearing a weighted backpack (awkward)
– Wearing a belt with weights hanging off it (what I do)
– My favorite method for doing weighted dips includes a special belt (shown here).
– Go Slower: keep your abs tight, and lower yourself ridiculously slow. Your body will have to recruit every muscle in your chest, shoulders, and triceps (including all stabilizer muscles) to keep your body under control.
– Try Ring Dips. They are a great way to build back and shoulder muscle. Lower yourself down until your chest touches the rings, and then push up until you are in a straight arm support position.
There you have it: your how-to guide for perfecting your dips. Tag us in your pre and post workout snaps on Instagram @fueluplife.


Leave a reply